· Brittany Ellich · tutorial · 10 min read
How to Host Your Static Site on AWS For (almost) Free

There are hundreds of places out there to host your blog or website, and the majority of blogs out there seem to highly recommend using something like HostGator or BlueHost, in part due to the affiliate money they receive from it. Sure, it may only be $2.95 per month, but those costs add up to nearly $36 per year, and that’s not including all of the add-ons they convince you that you will need.
That’s why I’m putting together this tutorial for you, showing you how you can go about saving those hosting costs by using tools on AWS’s free tier and learn a new tools while you’re at it!
There’s another reason I highly recommend using Amazon Web Services (AWS), in particular if you are a software developer, or hoping to become one. AWS is one of the leading cloud providers with only two real competitors (Microsoft Azure and Google Cloud Platform). Having skills with using AWS is incredibly valuable and will definitely help you with your career. So my goal here is to not only explain to you how to host your static content on AWS, but also to teach you a bit about the tools you will be using.
There are a few tools through the Amazon Web Services console we will be using for this tutorial. Let’s take a bit to get familiar with them before we jump into the tutorial. If you are already familiar with these, feel free to jump straight into the tutorial!

Static Content
Let’s start first with static content. When I’m talking about static content, it means web content that doesn’t need to be changed or manipulated anyway. It’s the most basic of websites, with just HTML, CSS, and JavaScript that likely isn’t backed by a database of any sort (so no logins, no saving blogs dynamically like this blog). For an example, my home page, brittanyellich.com, and just about every page on this site other than blog posts are considered static content. The blog posts I’ll get into in a later tutorial. This is a great place to start for beginners!
Amazon Route 53
Amazon Route 53 is Amazon’s Domain Name System (DNS) service. This is the service you can use to purchase a domain name and register it to you. For example, brittanyellich.com is the domain name that I registered for this website. This service is relatively straightforward. .com is just one of many different options you can use for the end of your domain, and they all have slightly different costs.
This is the reason for the almost in the title. Unfortunately you can’t host your content on a custom domain for free, but it’s also not required to get your content online. It just makes it a bit easier to find!
If you purchased a domain from a different service like GoDaddy, then that’s totally fine. There’s no requirement for purchasing your domain from AWS, I just prefer it to keep all of my expenses in one place.
Amazon Certificate Manager
Amazon Certificate Manager is what we will use to get the free SSL certificate for your website, so that you can get the fancy HTTPS access.
Amazon S3
Amazon S3, or Simple Storage Service, is Amazon’s object storage. This means that it’s storage for things like documents or mp3 files. Think of it like a filing cabinet, somewhere to store your static content.
It’s not ideal for database storage but is an excellent place to store just about any document, and it’s where we will be storing the static files that make up your website.
Amazon CloudFront
Amazon CloudFront is a content distribution network (CDN). It’s specialty is taking website content and caching it it around the world, which makes up the distribution of content. Essentially what it does is take a snapshot of your website and store it in edge locations, or different AWS server locations around the world, so that the content is closer to consumers and they can access it faster.
The primary reason we’re using Amazon CloudFront is that it will allow us to set up a security certificate for the site, which allows users to access the site through HTTPS and prevents the nasty Google message on Google Chrome that informs users that the site is not secure.
AWS IAM
AWS Identity and Access Management (IAM) is critical to this whole process. We will only be using this for setting up a Bucket Policy in S3, but it’s incredibly important to learn. IAM allows you to set up the roles, policies, and permissions that not only allow users to access your content, but also allows the AWS services to talk to one another. By default, your content stored in S3 won’t be accessible by the public or by CloudFront for distribution, so you have to set up policies that allow those services to talk to one another.

Tutorial
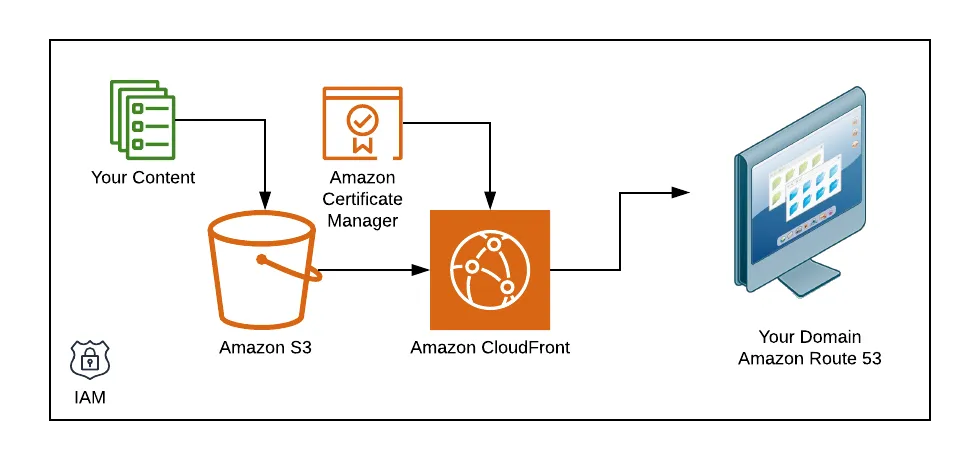
Enough background, let’s get into the tutorial! The diagram above is a general overview of what our architecture will look like for this project.
Step One: Set Up Custom Domain with Route 53
For this tutorial I’m going to assume that you want a custom domain. If you haven’t already set one up on a site like GoDaddy, head over to the AWS Console and either create a new account or sign in.

Our first stop in the AWS Console is going to be Route 53.
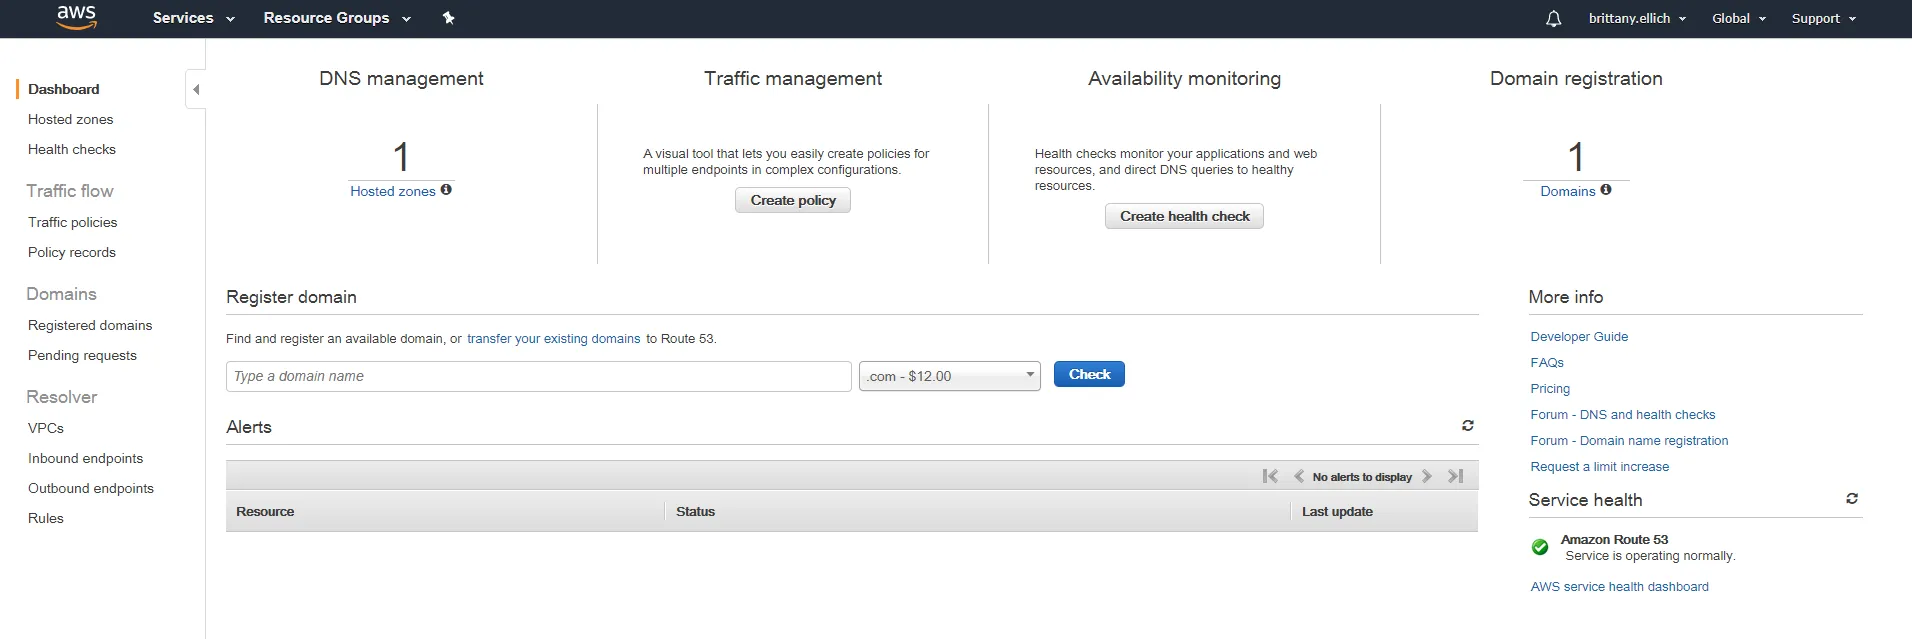
- In the “Register domain” box, search for the domain name that you would like to use for your static site to see if it’s available.
- If it’s available, awesome! You’re in luck! Click “Add to cart” and purchase the domain, and wait for the hosted zone to be available. If not, you may have to search for a slightly different name, or choose a different domain ending.
- Once the domain is finished propagating, you should be able to access it as a “Hosted Zone” from the Route 53 dashboard pictured above.
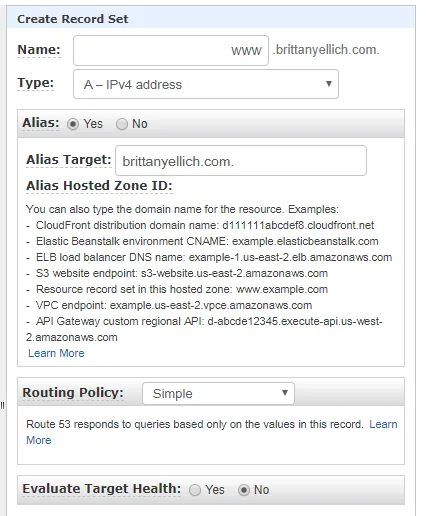
- One thing I recommend setting up first is a new record set so that your domain can be accessible either by going directly to it (ex. brittanyellich.com) or through an alias (ex. www.brittanyellich.com). Click “Create Record Set”. You will want the following setup, with a Type of “A - IPv4 address”, Alias set to “yes”, and in the dropdown for Alias Target pick your main domain name. Keep the Routing Policy as simple and click “Create”! You’re done here for now!

Step Two: Provision a Public Certificate from Certificate Manager
Our next step is to get the SSL certificate set up for your website. If your domain hasn’t propagated yet, you may have to wait until you’re able to create record sets to continue.
- On the “Services” tab in the AWS Console, search for and select “Certificate Manager”.
- Click on the “Get Started” button under “Provision Certificates”.
- Make sure the “Request a public certificate” radio button is selected, and click on the “Request a certificate” button.
- Enter your top-level domain name (ex. brittanyellich.com), as well as any aliases you want registered (ex. www.brittanyellich.com), and click next.
- Select “DNS validation” and click continue. DNS validation is a bit easier than email validation if you don’t have an email address set up yet for your domain name, which if you just created it, you probably don’t.
- Hit the “Confirm and Request” button, and wait for the DNS validation information to populate.
- If you created your domain on Route 53, there should be a button under the dropdown for each domain to automatically populate the record sets you need for the certificate to validate that you own that domain name. If you didn’t create it on Route 53, you’ll need to manually add those record sets on the site of whichever provider you purchased the domain from.
- DNS validation can take a bit of time to complete, likely around 15 minutes or so. This is a great opportunity to move onto the next step, Amazon S3!
Step Three: Set Up Your Amazon S3 Buckets for Hosting Your Static Content
We’re getting close to finishing up! The next step is to create an Amazon S3 bucket for holding all of the documents for your static site. S3 uses the concept of “buckets” for holding documents, and that’s where all of the built documents for your website are going to go.
- Back in the AWS Console, search for and navigate to S3.
- Click on the “Create Bucket” button, and enter the name of your domain for the Bucket name (i.e. brittanyellich.com).
- You can leave all of the settings on the “Configure options” page as they are and move on to the next tab.
- On the “Set permissions” tab, uncheck the “Block all public access” box. You will want all of the documents in your bucket to be visible for reading by the public. Click “Next”.
- Finally, review your settings and click on “Create bucket”.
- Now that your bucket is created, navigate into the bucket. It should be empty right now, but you can now add your static content directly to that bucket. Just take your entire project and upload it. I’ll go over a way to set up a pipeline to make this easier in another post.
- Navigate to the “Permissions” tab and add the following code snippet to your “Bucket Policy”, changing the domain name from brittanyellich.com to match your domain name (keep the /* at the end). This will set up public access to get objects in your bucket.
  	"Version": "2012-10-17",
    "Statement": [
  		{
        "Sid": "PublicReadAccess",
        "Effect": "Allow",
        "Principal": "*",
        "Action": "s3:GetObject",
        "Resource": "arn:aws:s3:::brittanyellich.com/"
      }
    ]
}- Navigate to the “Properties” tab and select the “Static Web Hosting” card. Enable the “Use this bucket to host a website” radio button, and add your index document, for example index.html. This will be where your website will be started from within the bucket.
Step Four: Set up Amazon CloudFront to Host Your Content!
We’re in the home stretch! This is the last step before you’ll be able to access your content online from your domain name!
- From the AWS Console under Services, search for and select CloudFront.
- Make sure you are in Click on “Create Distribution”.
- Under the “Web” header, select “Get Started”.
- Select your S3 bucket in the Origin Domain Name box. Under “Viewer Protocol Policy”, select “Redirect HTTP to HTTPS”. Under “Alternate Domain Names (CNAMEs), add your domain and your alias domain name (ex. brittanyellich.com and www.brittanyellich.com on separate lines). Check the “Custom SSL Certificate” radio button, and in the dropdown select the SSL certificate you created in Step Two. Finally, add the same document name that you added to your S3 bucket as your index document in the “Default Root Object” field, and then click on “Create Distribution”.
- It may take a few minutes for the state to switch to Enabled, but once that is completed you can now connect your CloudFront distribution to your domain. Head back to Route 53 and select your domain name Hosted Zone.
- On your list of record sets, there should be a record set with your domain name of type A. Click on that record set to edit it.
- Ensure that Alias is selected and in the “Alias Target” dropdown, select your new CloudFront distribution. Keep the routing policy as simple and click on “Save Record Set”.
That’s it! You should now be able to navigate to your website and see your static content. It’s quite a few steps and a lot of waiting, but once it’s set up you won’t ever have to set it up for that site again! Which is why it’s handy to keep a reference to how you set it up in the first place.
If you have any questions or got stuck anywhere along the way, feel free to reach out to me and I’ll see if I can help walk you through it. Thanks for sticking with me through the whole tutorial, and if it was helpful please feel free to share it with others that you think may find it useful!


